i haven't given up on my goal of reducing the amount of waste i produce, even though its been ages since i first brought up the subject. i have been busy testing out homemade alternatives to all the products i used to buy, use then throw in the trash (or recycling)! soooo, one of my biggest waste creating products - the oh so convenient make-up remover towelettes. you know, they come in a plastic package (waste), you pull one out, clean your face, and throw it away (more waste). did i mention that these things cost at least $8 dollars a pack (before adding tax)? did i also mention that the number one ingredient is water? followed by other things i can't pronounce. yes ladies, we have been paying close to $10 for paper towels soaked in water. yup. so i did a little internet research and found some recipes for homemade make-up removers. and then i felt awful because for years i'd been wasting my money on those towelettes when the whole time i had everything in my house to make a make-up remover. think of all the clothes i could have bought with that saved money!!!
ultimately, i decided to use the measurements from one recipe i found but different ingredients. this is literally the easiest diy ever and i'm almost embarrassed to even call it that, but i'm sure someone out there will be amazed at this. i decided to use coconut oil instead of olive oil - i don't know if you've heard, and its not scientifically proven, but coconut oil has magical powers. you can use it for everything. i'm pretty sure that when you use coconut oil in a homemade make-up remover it actually makes you more beautiful. like i said, its not scientifically proven but i'm like 90% sure its true. i also used dr. bronner's liquid soap instead of johnson's baby shampoo. dr. bronners is made from vegetables, completely biodegradable and yeah, i also think there might be some kind of magical powers in this soap (the website even says that its magic). homemade make-up remover instructions: grab a jar with a lid. heat one cup of water, you should probably do this on the stove and not in the microwave. pour hot water into the jar, and add one table spoon coconut oil and one tablespoon the soap of your choice. screw the lid onto the jar and shake to combine. that is it. homemade make-up remover. you should wait for it to cool down before using it. and if you are sitting here thinking "zero waste? what about the cotton pads that you will use to apply the make-up remover?" i've got a solution for that too. i made some flannel make-up remover squares like these. you could also just use an old t-shirt that you cut into squares, but the flannel squares are cuter. a few tips - do not use the peppermint dr. bronners, it will burn your eyes. i'd suggest the lavender, rose or the unscented mild baby soap. will you try the homemade make-up remover? i've been using it for months and i works just as well as the expensive, throw away towelettes. let me know what you think in the comments!
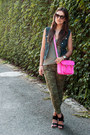
unless you've been living under a rock, you probably have heard that pastels are hot for spring '12. yay! pastels! i'm much more of a pastel girl than a neon girl. don't get me wrong, i love a little neon on my nails, but i don't think i could pull of a pair of neon yellow or green skinnies! one of my favorite pastel colors for the spring season - mint green. honestly, i'm not sure why its call mint as the actual leaf of the mint plant is not this color. i suppose mint toothpaste is this color. but really, who wants to wear something that is toothpaste green? so i've rounded up a few of my favorite mint colored spring '12 pieces:
if you follow me on instagram (@stylextraordinaire, if you don't you should!) you may have seen that i already bought those paige jeans (love!!). what are your thoughts on the pastel color trend? will you be wearing any minty green this coming spring?
i'm super excited about this post because: 1. i feel like i haven't done a really cool diy in a looong time & 2. i'm debuting my first video! that i shot & edited all by myself!! so, you may have noticed my nails in this post and thought "what is that & how do i do it?" the answer is: water marble nails. and this post will show you how to do it!
this is not an easy diy. in fact, i didn't even do my own nails. the first time my friends and i tried this technique we spent 4 hours doing it, and i got so frustrated after i did my first nail that i gave up. luckily my bff anjelica has mastered the technique, so she did my nails for me (twice now)! and this time she let me film her doing her own nails for a video tutorial! although, sooner or later i'm going to have to figure out how to do this myself!
tools:
cup - choose one that was cheap & you don't like. you won't want to drink from it ever again.
room temp. water - must be the perfect temp otherwise it doesn't work. see tips below.
nail polish
nail polish remover
clear top coat
cotton balls
tape - doesn't have to be medical tape, that is just what we used.
toothpicks - a straight pin will work too
old paint brush - or a q-tip if you don't have a brush
patience!!
step 1: choose your colors. two colors is easiest, but you can use more if you like. apply a base coat of the lightest color.
step 2: tape your fingers, leaving the nail exposed. if you don't do this you'll spend hours cleaning nail polish off your fingers!
step 3: start adding the drops of nail polish to your water, alternating the colors. a photo doesn't do this step justice, so check out the video:
a few tips:
- if the water is too cold, the polish will not spread as easily and will dry too quickly.
- if the water is too hot, the polish with drop the the bottom of the cup.
- unscrew the brushes from the bottles before you add the first drop.
- move as quickly as possible when adding the polish drops! if you take too long the polish dries and you have to start over.
- some polish brands work better than others. we had the best luck when at least one of the polishes was lili brand polish. china glaze is supposed to work good too. use cheap polish, you will waste a lot of it (no chanel!).
repeat step 3 until you've done all your nails
step 4: once you've let your nails dry, remove the tape. use the brush dipped in nail polish remover to get any polish off your skin. apply a clear top coat. and you're done!
wow, this sounds a lot easier than it actually is. i would suggest watching at least 3 more video tutorials (there are TONS on youtube). even though its not easy, i love the way this technique looks! each nail had a different pattern, and no one will have the exact same pattern! has anyone tried out this technique? any tips to add? let me know in the comments!
i like both drug store and department store products. i've been using neutrogena's oil free acne wash since i was 12! i definitely don't think you need to spend a lot on a cleanser, and the pink grapefruit smells delish! mason pearson brushes are a little on the pricey side, but it is a total investment - i've had mine for like 15 years! i've been using clinique products for quite awhile and am pretty happy with the way my skin looks. what are your favorite night time skincare products?